

How To Make Photos Private Facebook
Facebook is one of the biggest social media platforms to date. It boasts billions of users around the world. People can connect to their loved ones with this social media giant and it's a great way to keep yourself updated on your friends and family members. However, you may want to protect your security and privacy on the platform. That's why you should know how to make photos private on Facebook . In this way, only your friends (or only you) can see your photos and it can't be checked by prying eyes.
As such, this guide will help you know how to make photos private on Facebook. It will allow you to make sure that your pictures (or albums) are kept secure so that nobody else sees it – at least, someone you don't want to gain access to your pictures won't be able to check it out. Let's start making your Facebook photos and albums private!
Article GuidePart 1. Why Should I Learn How To Make Photos Private On Facebook?Part 2. How To Make Photos Private On Facebook?Part 3. Bonus Recommendation: Remove Duplicate Photos from MacPart 4. Conclusion
Part 1. Why Should I Learn How To Make Photos Private On Facebook?
There's one big reason why you should learn how to make photos private on Facebook. This reason would be for privacy. You may not want other people to check out your photos because you want to keep your private life under the hood. And, there might be reasons related to work or business as well. For instance, if you're applying for a job, you may want to keep your party pictures to yourself. This is because it may affect your application for the position.
In addition, you want to be secure as you don't want people to know what you're doing for the past weeks or months. Privacy and security are two of the most common concerns if you want to know how to make photos private on Facebook.
Part 2. How To Make Photos Private On Facebook?
In this section, we will be giving you the top ways on how to make photos private on Facebook. In this way, you will know that you have privacy and security and will give you the peace of mind you need.
Method 01. How To Make A Single Photo Private Using A Desktop Computer
Here are the steps on how to make a single photo private using a desktop:
- Open your browsers such as Google Chrome, Firefox, Safari, or Opera.
- Go to the address bar and open Facebook by typing in its URL. If you're already logged into Facebook, this will launch your account's news feed. If you are not signed into FB, you must input your email address and its corresponding password for the account you own.
- Visit your profile. This will be the name of your account located in the top-right corner of the interface of Facebook.
- Click the tab labeled Photos. This will be seen under your cover photo. The cover photo can be found at the top part of your Facebook profile page.
- Choose a photo category. Do this by clicking a category tab such as "Your Photos" located near the upper portion of the page.
- Choose a photo by clicking it. Make sure this is the photo you want to keep private. The photo will now open up. You have to make sure that you were the one who uploaded the photo (and not someone else).
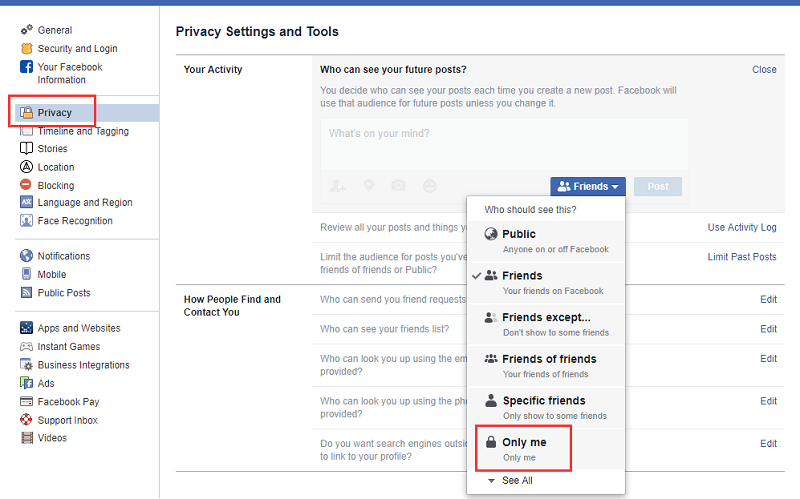
- Click the icon for Privacy. This looks like a silhouette of two people. You'll find it in the lower right of your name. The name can be found in the upper right part of the picture. It will display a drop-down menu. It is important to note that if you click this icon and it says "Edit Post Privacy", click that option. After that, click the icon for Privacy located at the upper portion of the post before you continue.
- Click "More" within the drop-down menu that appears.
- Press the option that says "Only Me" this will be expanded within the drop-down menu. By this time, you have learned how to make photos private on Facebook using your desktop computer.
Method 02. How To Make A Photo Private Using Your Mobile Device
The steps below will show you how to make your photo private using your mobile device. We're referring to a single photo here. Now, look at the steps below to learn how to make photos private on Facebook using a mobile device:
- Open Facebook by pressing the FB icon. This looks like a white F imposed within a blue background. If you're already logged in, the news feed will show up. If you haven't signed in, you should input your account's email address and the corresponding password.
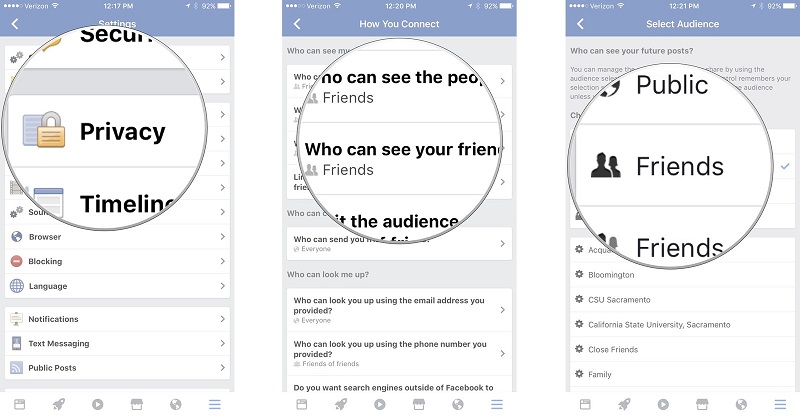
- Tap the three vertical lines that are the menu. For iPhone users, this is located in the lower-right part of the interface. For Android users, this is located at the top part of the interface. The menu will now show up.
- Press your Facebook account name. This can be seen at the menu's top section. This will display your profile page.
- Scroll down the interface until you see Photos. Tap "Photos" as you can see it under the section of your information.
- Press a category of the photo (such as Uploads). This can be seen in the top section of the interface.
- Choose a photo you wish to keep private. Tap it to open the actual photo. It is important to note that this photo should be uploaded by you and not by somebody else. If you were just tagged in it, you won't be able to adjust its privacy settings.
- Tap the three dots (…) located on the upper right part of the interface to display the menu. If you're using the Android phone, simply tap and then hold this tap on the photo.
- Press the option labeled "Edit Privacy". This can be seen within a menu. It will also open up a brand new menu. For other pictures, you have to press "Edit Post Privacy" instead of the one stated here in Step 8. If you notice that you can't see the two options here in Step 8, this photo is part of an album created by a user. Thus, you cannot make it private. Instead, you will have to make the entire album private (more on this later).
- Press More. This option is located at the bottom part of its menu. If it shows "Only Me" within the menu, you have to skip this Step 9.
- Press "Only Me" which is another option you can find on the menu. Finally, press "Done" located in the upper right part of the interface. Now, you have learned how to make photos private on Facebook using your mobile device.
Method 03. How To Make An Entire Album Private Using Your Desktop Computer
In this part, we won't only learn how to make photos private on Facebook, we'll also learn how to make entire albums secure and safe. Below are the different steps you should follow (in correct order) to keep albums private on your desktop computer:
- Open your browser on your computer. This may be Google Chrome, Safari, Firefox, Opera, or any other browser you want.
- Launch Facebook by placing their URL within the browser address bar. Your news feed will show up if you're already logged in. But, if you're not, then you should input your FB account email address and its corresponding password.
- Visit your profile by clicking your name located at the upper right part of the website's interface.
- Click the tab labeled Photos. This will be seen under your cover photo. The cover photo can be found at the top part of your Facebook profile page.
- Click the tab labeled "Album". This tab can be seen at the top right part of the page for "Photos". This will display different photo albums within your FB profile.
- Locate the album you wish to make private or secure. It is important to note the following:
- There are FB albums that are in-built within the website of Facebook, these are the ones that cannot be kept private.
- The album that FB calls "Mobile Uploads" cannot have its privacy adjusted. This is the same for the album called "iOS Photos" in outdated uploads from that of iOS phones.
- Click the three dots located in the bottom-right part of the cover of the album. This will display a tiny menu. It is important to know that if you cannot see the icon for the three dots, adjustments to its privacy can't be done. However, you can simply make photos and videos private one by one.
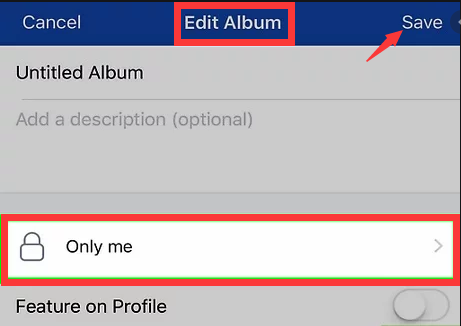
- Press "Edit". This is located within the menu that will pop up. The page of the album will be displayed afterward.
- Press the "Privacy" box that is in drop-down style. Then, click "Only Me". If this option isn't displayed, click "See All Lists…".
- Then, click "Save". By now, you have learned how to make photos private on Facebook (actually, we've done it on an entire album).
Method 04. How To Make An Entire Album Private Using A Mobile Device
- Launch Facebook. Your news feed will show up if you're already logged in. But, if you're not, then you should input your FB account email address and its corresponding password.
- Tap the three vertical lines that are the menu. For iPhone users, this is located in the lower-right part of the interface. For Android users, this is located at the top part of the interface. The menu will now show up.
- Press your name. Then, scroll down to see the "Photos" label and tap on it.
- Press "Albums" to show the different albums you possess within your FB profile.
- Find an album you wish to make private.
- Click the three dots located in the top-right part of the album. This will display a tiny menu. It is important to know that if you cannot see the icon for the three dots, adjustments to its privacy can't be done. However, you can simply make photos and videos private one by one.
- Tap the actual privacy setting of the album. It will typically say "Public" or "Friends". Then, press "Only Me" within the menu.
- Finally, click "Save". This will allow you to make the album private within your profile. Again, you have learned how to make photos private on Facebook including that of entire albums.
Part 3. Bonus Recommendation: Remove Duplicate Photos from Mac
Know that you have learned how to make photos private on Facebook, we'll give you one of the best tips you can get. We recommend that you use iMyMac PowerMyMac and its Duplicate Finder Module in order to locate and remove unnecessary files especially duplicates within your system. It is a great tool to optimize your Mac and keep it performing to its full potential. This is through finding unnecessary files (junk files and temp files) within your system. With just a few clicks, all of these junk data are removed.
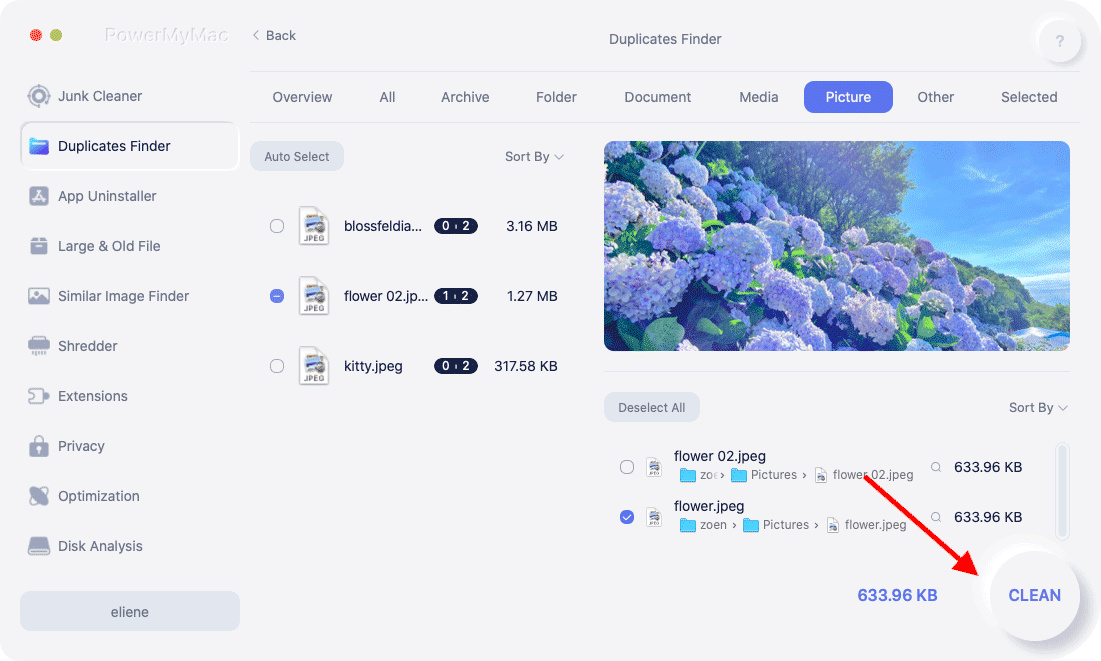
Plus, you can use the Duplicate Finder module to find duplicate files on your system. These unnecessary second (or even third and fourth) copies of the same file can be detected and removed easily. Using the tool is very easy as the interface is sleek and pleasing to the eyes. And, it's straightforward and can be understood by anybody.
Part 4. Conclusion
We have given you four different methods on how to make photos private on Facebook. We also helped you make entire albums private. These can be done on both full-fledged computers and even mobile devices. As you can see, the process is fairly easy. Plus, it's a great way to make sure your privacy and security are kept in place.
You will notice that we recommended a great tool to help you optimize your Mac – iMyMac PowerMyMac and its Duplicate Finder module. This tool is a great way to remove unnecessary files from your system. So, if you want to make your Mac computer run faster, grab the software now!
![]() Get A Free Trial Now!
Get A Free Trial Now!
PowerMyMac
A powerful all-in-one App for Mac
Free Download
How To Make Photos Private Facebook
Source: https://www.imymac.com/mac-cleaner/how-to-make-photos-private-on-facebook.html
Posted by: russotookents.blogspot.com
0 Response to "How To Make Photos Private Facebook"
Post a Comment